REST (Representational state transfer) API is a set of methods like GET, PUT, POST, DELETE to create web services. The RESTful Web services allow to request to access and manipulate textual representations of data using uniform and predefined set of stateless methods. Web services are useful when develop a application for web and mobile.
In our previous tutorial, you have learned how to create Restful API using PHP and MySQL. In this tutorial, you will learn how to create RESTful API using CodeIgniter.
We will cover this tutorial to create RESTful API with methods GET, PUT, POST, DELETE with live example.
Also, read:
- Create RESTful API using Python & MySQL
- Creating REST API with Golang
- Create Simple REST API with PHP & MySQL
Before proceeding with this tutorial, we hope that you have setup your CodeIgniter project with MySQL database connection details to use with this example. So let’s start
Step1: Create MySQL Database Table
As we will implement methods GET, PUT, POST, DELETE, so we will create employee table to add, edit delete and display employee operations with REST API.
CREATE TABLE `employee` (
  `id` int(11) NOT NULL,
  `name` varchar(255) NOT NULL,
  `skills` varchar(255) NOT NULL,
  `address` varchar(255) NOT NULL,
  `designation` varchar(255) NOT NULL,
  `age` int(11) NOT NULL
) ENGINE=InnoDB DEFAULT CHARSET=latin1;
ALTER TABLE `employee`
  ADD PRIMARY KEY (`id`);
ALTER TABLE `employee`
  MODIFY `id` int(11) NOT NULL AUTO_INCREMENT;
COMMIT;
Step2: Create REST API Config File
First we will create REST config file application/config/rest.php. We will create config file using following code.
<?php
defined('BASEPATH') OR exit('No direct script access allowed');
$config['force_https'] = FALSE;
$config['rest_default_format'] = 'json';
$config['rest_supported_formats'] = [
    'json',
    'array',
    'csv',
    'html',
    'jsonp',
    'php',
    'serialized',
    'xml',
];
$config['rest_status_field_name'] = 'status';
$config['rest_message_field_name'] = 'error';
$config['enable_emulate_request'] = TRUE;
$config['rest_realm'] = 'REST API';
$config['rest_auth'] = FALSE;
$config['auth_source'] = 'ldap';
$config['allow_auth_and_keys'] = TRUE;
$config['auth_library_class'] = '';
$config['auth_library_function'] = '';
$config['rest_valid_logins'] = ['admin' => '1234'];
$config['rest_ip_whitelist_enabled'] = FALSE;
$config['rest_handle_exceptions'] = TRUE;
$config['rest_ip_whitelist'] = '';
$config['rest_ip_blacklist_enabled'] = FALSE;
$config['rest_ip_blacklist'] = '';
$config['rest_database_group'] = 'default';
$config['rest_keys_table'] = 'keys';
$config['rest_enable_keys'] = FALSE;
$config['rest_key_column'] = 'key';
$config['rest_limits_method'] = 'ROUTED_URL';
$config['rest_key_length'] = 40;
$config['rest_key_name'] = 'X-API-KEY';
$config['rest_enable_logging'] = FALSE;
$config['rest_logs_table'] = 'logs';
$config['rest_enable_access'] = FALSE;
$config['rest_access_table'] = 'access';
$config['rest_logs_json_params'] = FALSE;
$config['rest_enable_limits'] = FALSE;
$config['rest_limits_table'] = 'limits';
$config['rest_ignore_http_accept'] = FALSE;
$config['rest_ajax_only'] = FALSE;
$config['rest_language'] = 'english';
$config['check_cors'] = FALSE;
$config['allowed_cors_headers'] = [
  'Origin',
  'X-Requested-With',
  'Content-Type',
  'Accept',
  'Access-Control-Request-Method'
];
$config['allowed_cors_methods'] = [
  'GET',
  'POST',
  'OPTIONS',
  'PUT',
  'PATCH',
  'DELETE'
];
$config['allow_any_cors_domain'] = FALSE;
$config['allowed_cors_origins'] = [];
Step3: Create REST Library Files
We will create libaray files for handling RESTful web services operations. We will create application/libraries/Rest_lib.php and application/libraries/Format.php. The Rest_lib.php library will be extended into Emp.php API controller. Both the files are already created and available in download project files.
Step4: Create REST API Controller
We will create application/controllers/api/Emp.php to handle RESTful API methods like GET, PUT, POST and DELETE to handle web services operations.
<?php
require APPPATH . 'libraries/Rest_lib.php';
class Emp extends Rest_lib {
	public function __construct() {
       parent::__construct();
       $this->load->database();
    }
    public function index_get($id = 0){
        if(!empty($id)){
            $empData = $this->db->get_where("employee", ['id' => $id])->row_array();
        }else{
            $empData = $this->db->get("employee")->result();
        }
        $this->response($empData, Rest_lib::HTTP_OK);
	}
    public function index_post(){
        $postData = $this->input->post();
        $this->db->insert('employee',$postData);
        $this->response(['Employee created successfully.'], Rest_lib::HTTP_OK);
    }
    public function index_put($id){
        $putData = $this->put();
        $this->db->update('employee', $putData, array('id'=>$id));

        $this->response(['Employee updated successfully.'], Rest_lib::HTTP_OK);
    }
    public function index_delete($id){
        $this->db->delete('employee', array('id'=>$id));
        $this->response(['Employee deleted successfully.'], Rest_lib::HTTP_OK);
    }
}
Step5: Run RESTful API
The following RESTful web service URL create to perform GET, PUT, POST and DELETE operation for employee.
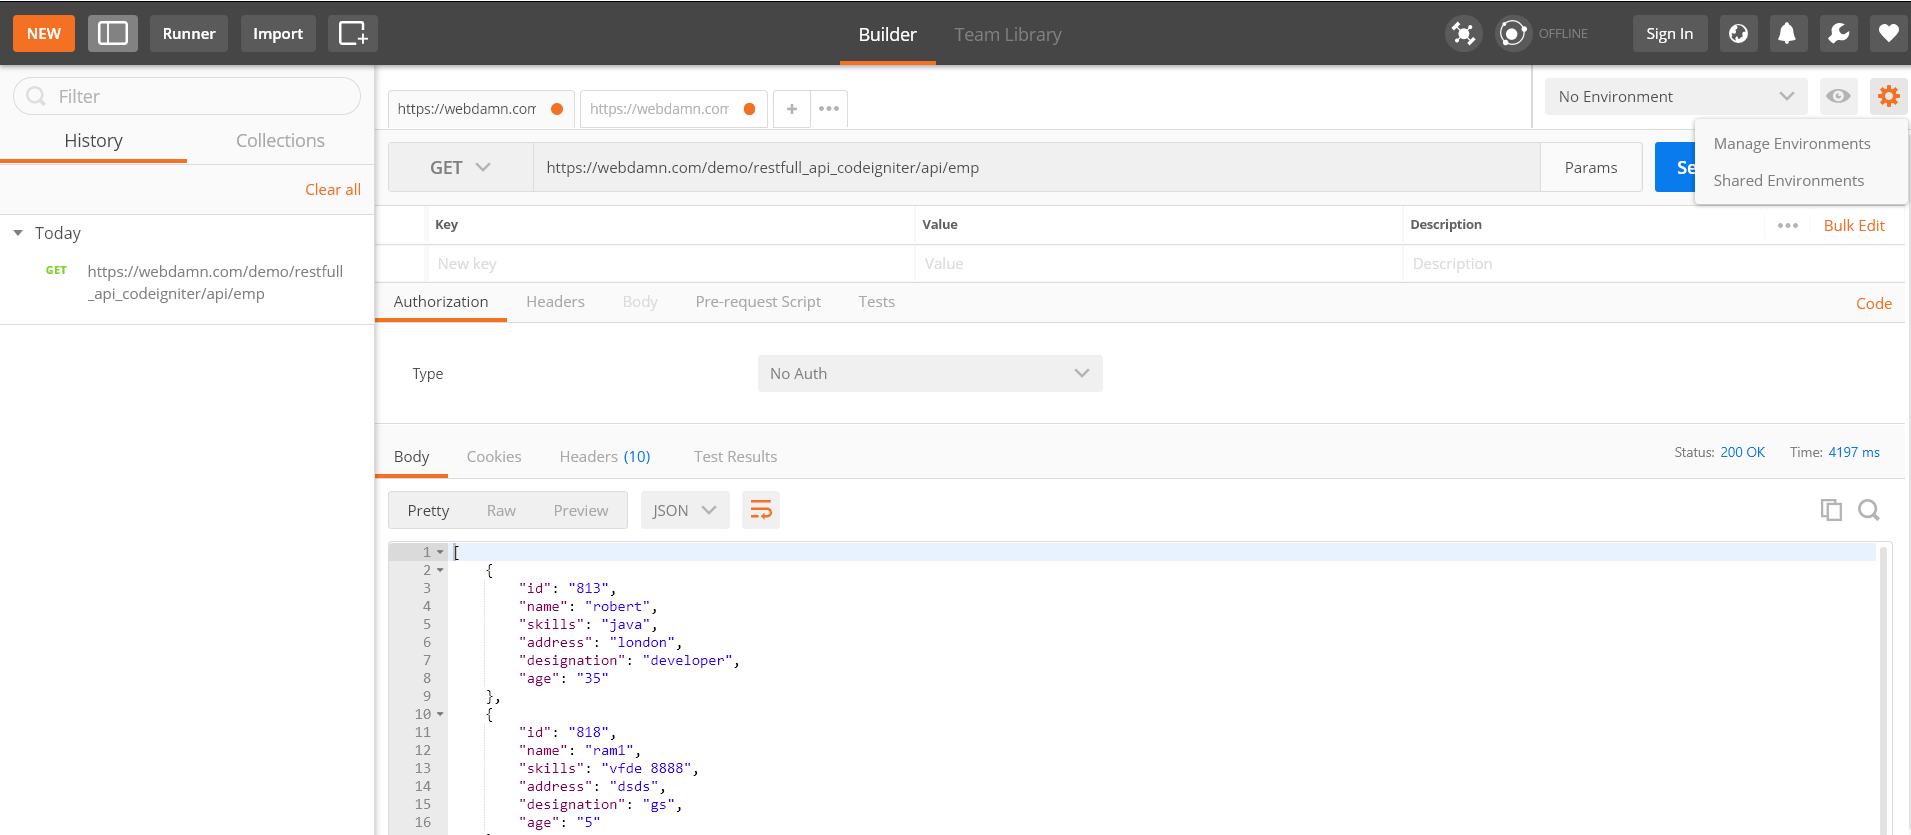
https://webdamn.com/demo/restfull_api_codeigniter/api/emp
Now we will make request to this web service using Postman browser extension.
Get All Employee Records to Display:
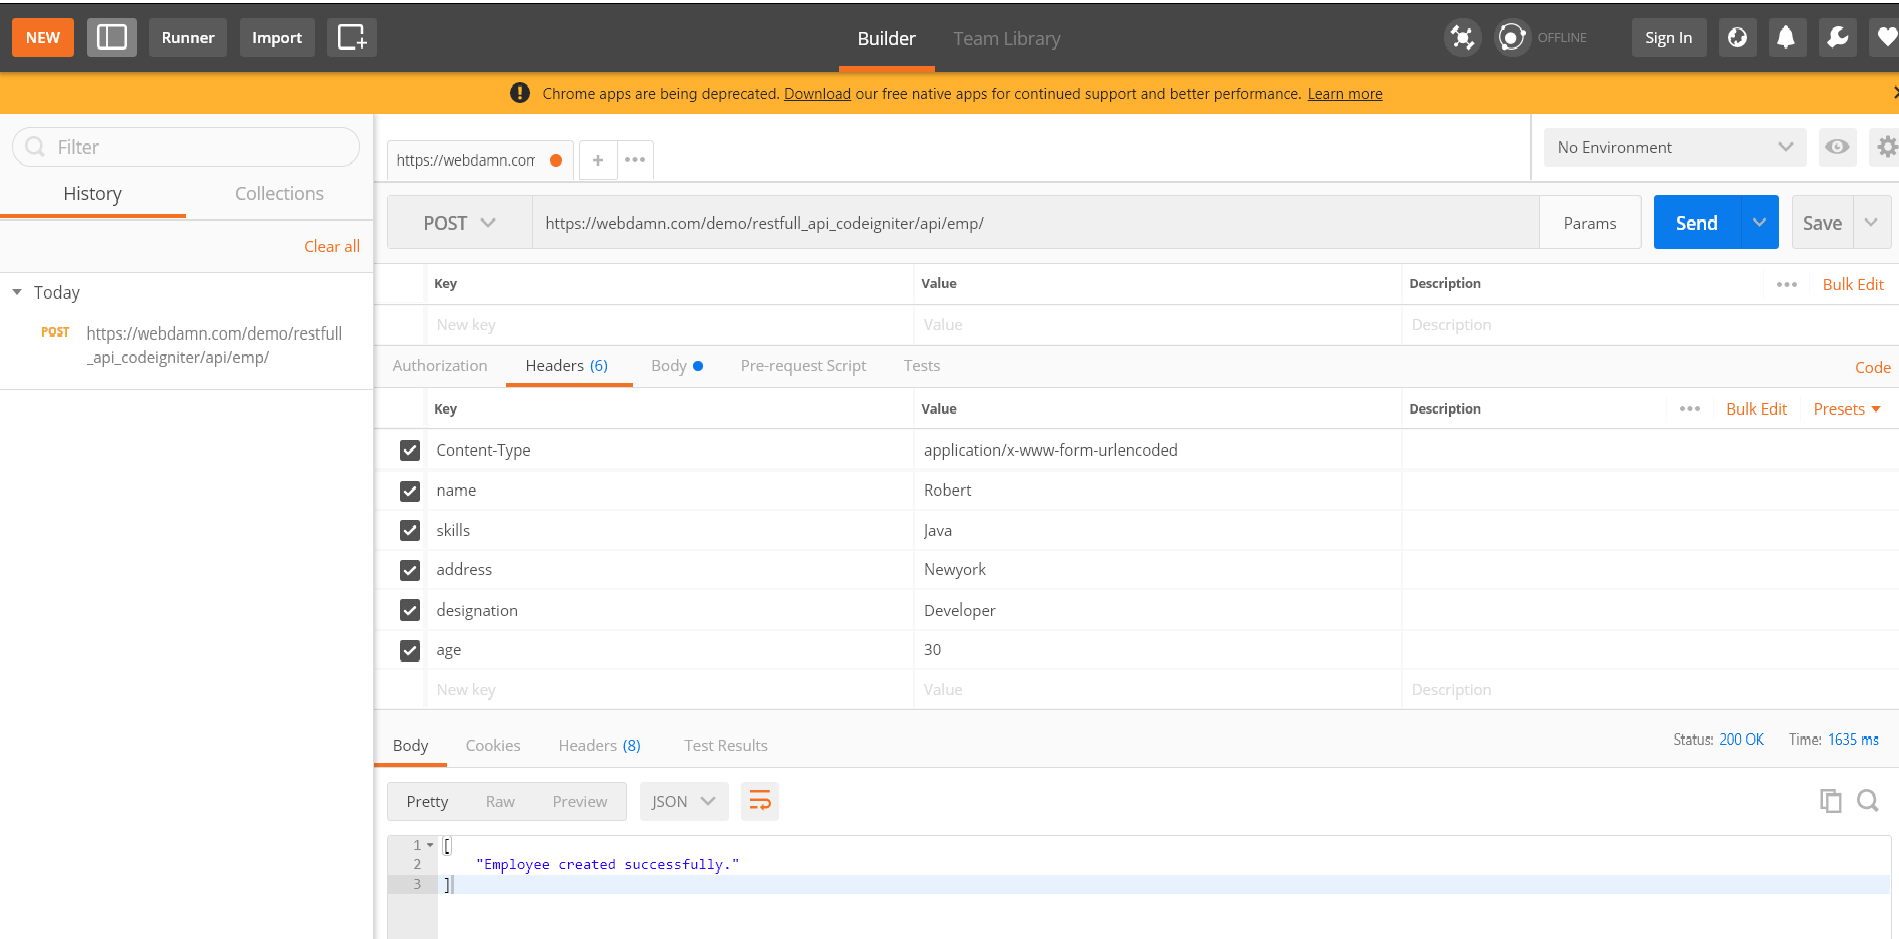
Post Employee Details to Insert New Employee Record:
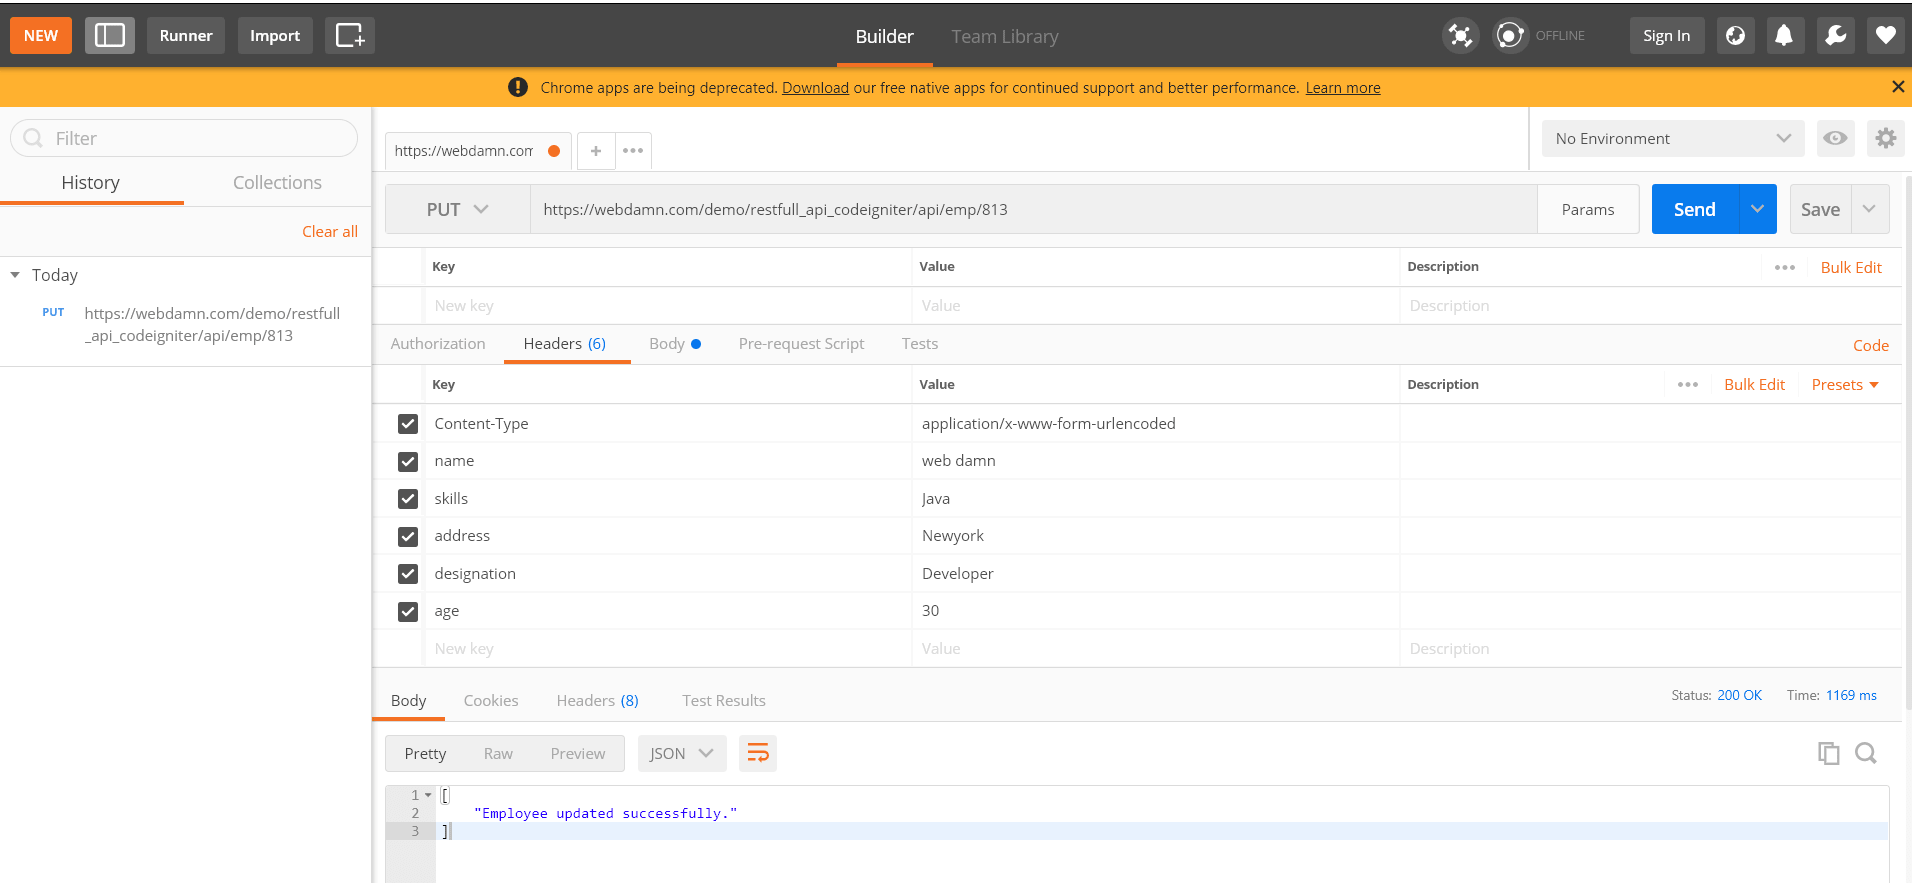
Put Employee Details to Update Employee Record:
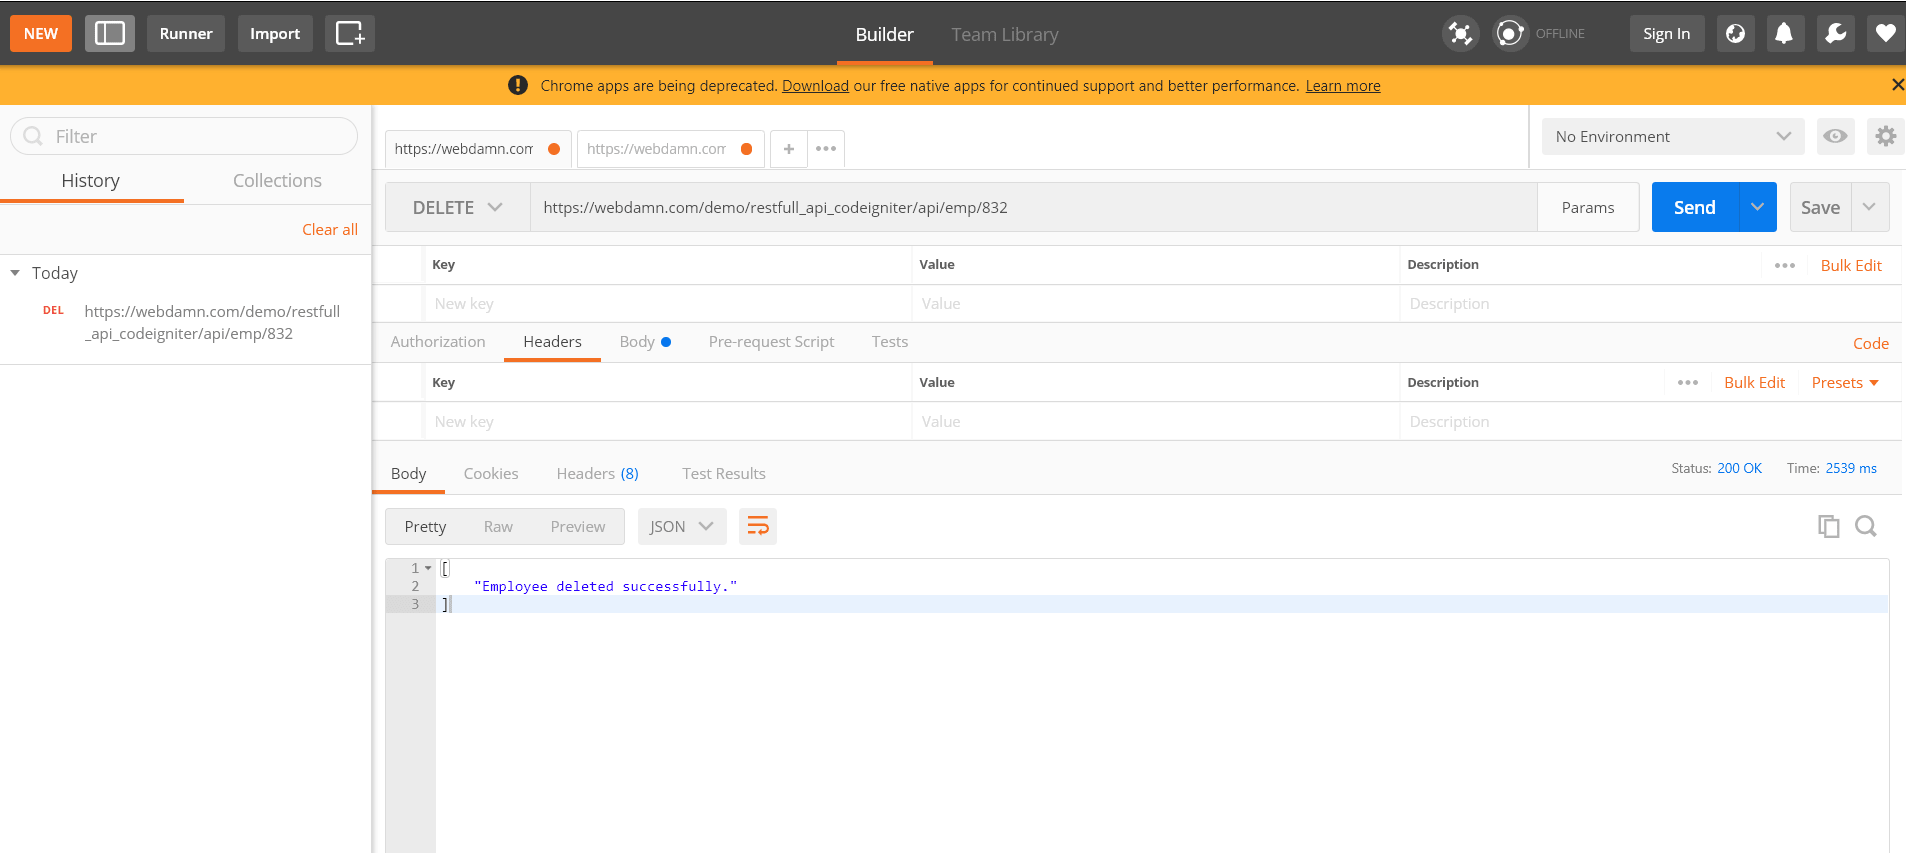
Delete Employee Record:
You may also like:
- CodeIgniter Tutorial for Beginners
- Upload Multiple Files in CodeIgniter
- Ajax Pagination in CodeIgniter with Example
- Form Validation in CodeIgniter with Example
- Ajax CRUD Operation in CodeIgniter with Example
- Export Data to Excel with PhpSpreadsheet using CodeIgniter
- DataTables Add Edit Delete with CodeIgniter
You can view the live demo from the Demo link and can download the script from the Download link below.
Demo Download