In our previous Python project tutorial, we have explained How To Use Pandas Library in Python. In this tutorial, we will explain how to develop a Face Recognition Based Attendance System using Python, Flask and MySQL.
The face recognition attendance management system provide a quick way to take attendance of students, teachers, employees etc. The system recog the faces and mark attendance of the recognized faces into an excel sheet.
We will develop the system using face_recognition package from Python. During user register process, we will store the user image in database and upload image to a directory. Then we will capture image through webcam and recognize to complete attendance.
So let’s proceed with tutorial to develop system.
Prerequisites
- Python
- Flask package
- Flask_mysqldb package
- Numpy package
- face_recognition package
- Knowledge of Python, HTML.
Application Setup
First, we will create our application directory face-recognition-attendance-system-python-flask-mysql using below command.
$ mkdir face-recognition-attendance-system-python-flask-mysql
we moved to the project direcotry
$ cd face-recognition-attendance-system-python-flask-mysql
Install Required Python Moudles
We will install flask, flask_mysqldb, Numpy and face_recognition package from Python.
- Flask: It is a micro framework from Python to create web application. So we will install this package to create web applications. We will install it using the below command:
pip install Flask
- flask_mysqldb: This is Python package that can be used to connect to MySQL database. We will install it using the below command:
pip install flask_mysqldb
- Numpy: This is Python package that can be used for working with arrays.:
pip install numpy
- face_recognition: This is Python package that can be used for recognize and manipulate faces:
pip install face_recognition
Create MySQL Database Table
As we will store use information in user table in MySQL database, so we will create table using below query:
CREATE TABLE `user` (
  `id` int(11) UNSIGNED NOT NULL,
  `first_name` varchar(255) DEFAULT NULL,
  `last_name` varchar(255) DEFAULT NULL,
  `email` varchar(255) DEFAULT NULL,
  `password` varchar(64) NOT NULL,
  `picture` varchar(250) NOT NULL,
  `role` enum('admin','user') DEFAULT 'admin'
) ENGINE=InnoDB DEFAULT CHARSET=utf8;
Import Python Packages
We will create app.py Python file and import installed packages.
from flask import Flask, flash, render_template, request, redirect, url_for, session, Response
from werkzeug.utils import secure_filename
from flask_mysqldb import MySQL
import MySQLdb.cursors
import cv2
import numpy as np
import face_recognition
from datetime import datetime
import re
import os
import sys
We will define user image path and also create function to validate allowed image files.
UPLOAD_FOLDER = r'C:\python_program\face-recognition-attendance-system-python-flask-mysql\faces'
ALLOWED_EXTENSIONS = {'png', 'jpg', 'jpeg', 'gif'}


def allowed_file(filename):
    return '.' in filename and \
           filename.rsplit('.', 1)[1].lower() in ALLOWED_EXTENSIONS
Loading Attendance Page
We will check for route attendance and load attendance.html template file.
@app.route("/attendance", methods =['GET', 'POST'])
def attendance():
    if 'loggedin' in session:
        userId = request.args.get('userid')
        return render_template("attendance.html", userid = userId)
    return redirect(url_for('login'))
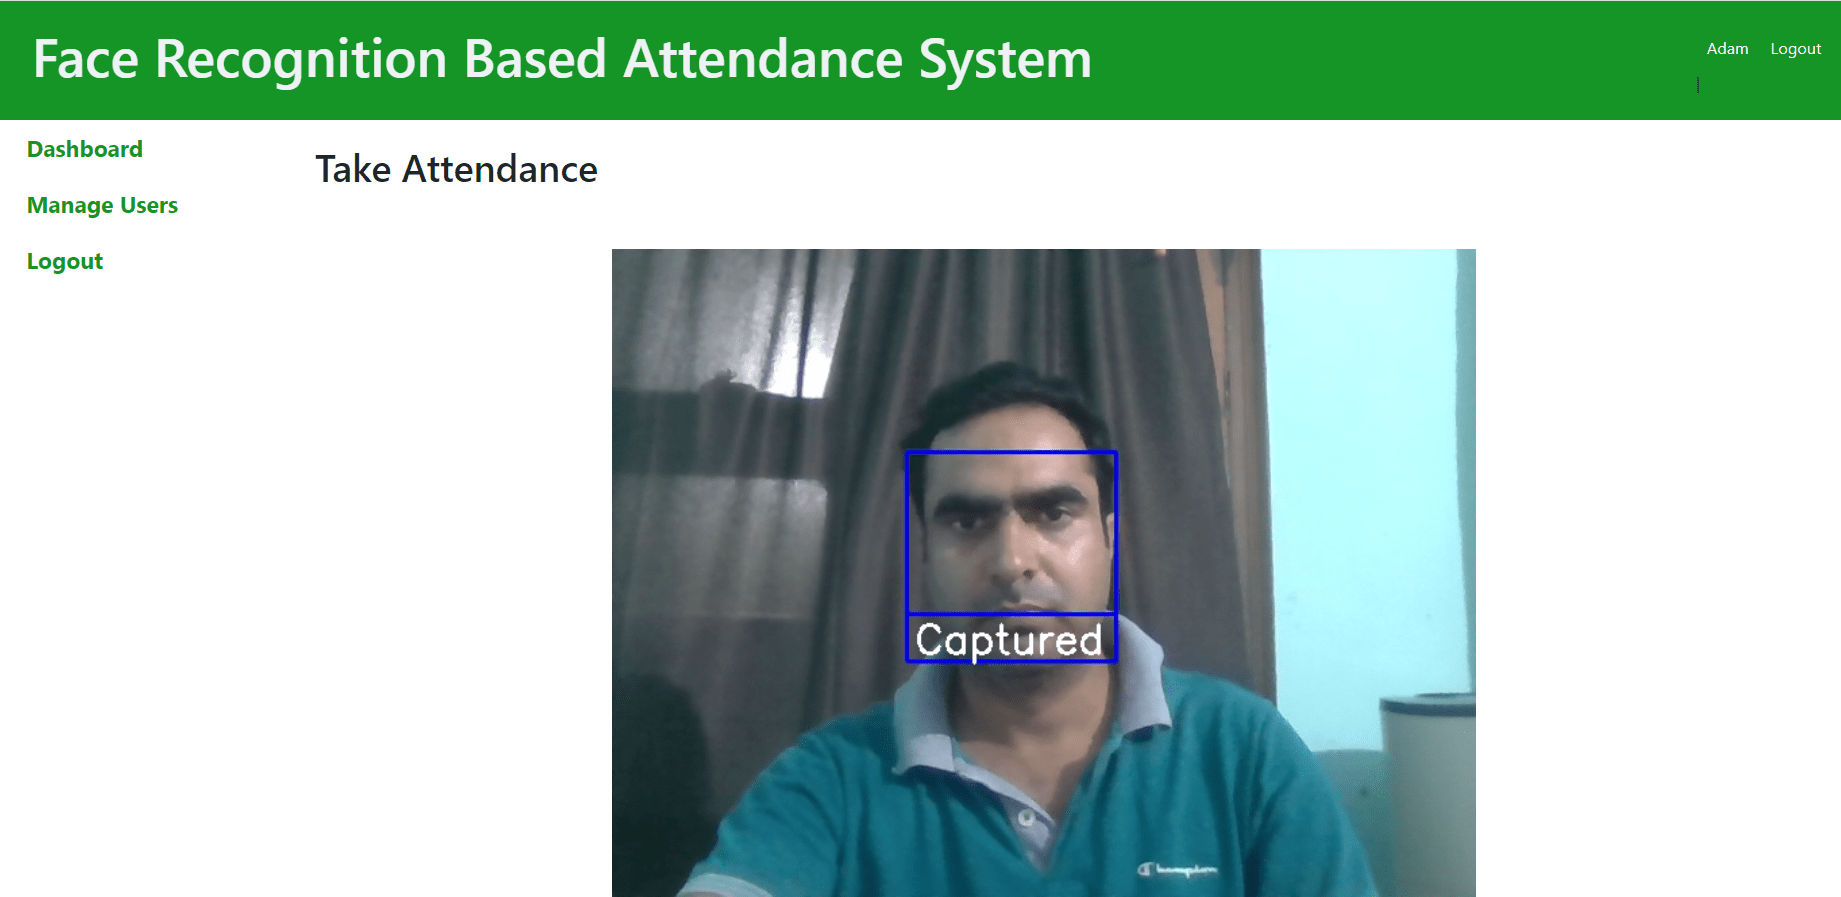
In attendance.html template file, we will call take_attendance route to call take_attendance() function to load webcap to complete attendance.
<div class="container-fluid" id="main">
	{% include 'top_menus.html' %}
	<div class="row row-offcanvas row-offcanvas-left">
		{% include 'left_menus.html' %}
		<div class="col-md-9 col-lg-10 main">
			<br>
			<h3>Attendance</h3>
			<br><br>
			<div class="mx-auto" style="width: 700px;">
			  <img src="{{ url_for('take_attendance', userid=userid) }}">
			</div>
			<br><br>

		</div>
	</div>
</div>
Implement Face Recognition and Update Attendance
We will define take_attendance() function and call generate() function to recognise user face.
@app.route('/take_attendance')
def take_attendance():
    userId = request.args.get('userid')
    cursor = mysql.connection.cursor(MySQLdb.cursors.DictCursor)
    cursor.execute('SELECT * FROM user WHERE id = % s', (userId, ))
    user = cursor.fetchone()
    if(user['picture']):
        return Response(generate(user['picture']),
                        mimetype='multipart/x-mixed-replace; boundary=frame')
we will implement generate() function. We will get user’s saved image and then compare with webcam captured image using face_recognition module functions. We will write attendance to attendence.csv file.
def generate(userImage):
    IMAGE_FILES = []
    filename = []
    imageDir = r'C:\python_program\face-recognition-attendance-system-python-flask-mysql\faces'

    if userImage:
        img_path = os.path.join(imageDir, userImage)
        print(img_path)
        img_path = face_recognition.load_image_file(img_path)
        IMAGE_FILES.append(img_path)
        filename.append(userImage.split(".", 1)[0])


    def encoding_img(IMAGE_FILES):
        encodeList = []
        for img in IMAGE_FILES:
            img = cv2.cvtColor(img, cv2.COLOR_BGR2RGB)
            encode = face_recognition.face_encodings(img)[0]
            encodeList.append(encode)
            return encodeList


    def addAttendence(name):
       with open('attendence.csv', 'r+') as f:
            mypeople_list = f.readlines()
            dateList = []
            now = datetime.now()
            datestring = now.strftime('%m/%d/%Y')
            for line in mypeople_list:
                entry = line.split(',')
                dateList.append(entry[1])
            if datestring not in dateList:
                timestring = now.strftime('%H:%M:%S')
                f.writelines(f'\n{name},{datestring}')

    encodeListknown = encoding_img(IMAGE_FILES)

    cap = cv2.VideoCapture(0)

    while True:
        success, img = cap.read()
        imgc = cv2.resize(img, (0, 0), None, 0.25, 0.25)
        # converting image to RGB from BGR
        imgc = cv2.cvtColor(img, cv2.COLOR_BGR2RGB)

        fasescurrent = face_recognition.face_locations(imgc)
        encode_fasescurrent = face_recognition.face_encodings(imgc, fasescurrent)

        # faceloc- one by one it grab one face location from fasescurrent
        # than encodeFace grab encoding from encode_fasescurrent
        # we want them all in same loop so we are using zip
        for encodeFace, faceloc in zip(encode_fasescurrent, fasescurrent):
            matches_face = face_recognition.compare_faces(encodeListknown, encodeFace)
            face_distence = face_recognition.face_distance(encodeListknown, encodeFace)
            # print(face_distence)
            # finding minimum distence index that will return best match
            matchindex = np.argmin(face_distence)

            if matches_face[matchindex]:
                name = filename[matchindex].upper()
                putText = 'Captured'
                y1, x2, y2, x1 = faceloc
                # multiply locations by 4 because we above we reduced our webcam input image by 0.25
                # y1,x2,y2,x1 = y1*4,x2*4,y2*4,x1*4
                cv2.rectangle(img, (x1, y1), (x2, y2), (255, 0, 0), 2)
                cv2.rectangle(img, (x1, y2 - 35), (x2, y2), (255, 0, 0), 2, cv2.FILLED)
                cv2.putText(img, putText, (x1 + 6, y2 - 6), cv2.FONT_HERSHEY_SIMPLEX, 1, (255, 255, 255), 2)
                addAttendence(name)  # taking name for attendence function above

        frame = cv2.imencode('.jpg', img)[1].tobytes()
        yield (b'--frame\r\n'b'Content-Type: image/jpeg\r\n\r\n' + frame + b'\r\n')
        key = cv2.waitKey(20)
        if key == 27:
           cap.release()
           cv2.destroyAllWindows()
           break
You can download the complete source code of project from the Download link below.