In our previous Python project tutorial, we have explained Face Recognition Based Attendance System with Python. In this tutorial, we will explain how to implement Real-time Face Recognition Project with Python and OpenCV.
Face recognition is an artificial intelligence (AI)-based computer technology used to find and identify human faces in digital images and video. It can be used in web application for many reasons such as surveillance and tracking of people in real time.
We can easily implement the face detection and analysis in python using OpenCV, face-recognition and NumPy Packages.
So Let’s start coding:
Install Required Packages
First we will install required Python packages.
We will install OpenCV, an open-source library for computer vision, machine learning, and image processing. We will install package using below command.
pip install opencv-python
We will install face-recognition AI Model package for recognising and scaning human faces. We will install this module using below command:
pip install face-recognition
We will also need to install NumPy package for implement functionality.
pip install numpy
Implement Face Detection
After installing required packages, we will import packages in ourb Python file.
import cv2
import numpy as np
import face_recognition
import os
The cv2 is opencv-python package used for image processing. The face_recognition is for recognise human faces. Numpy and os modules used for arrays and file handling.
capture = cv2.VideoCapture(0)
The Videocapture() is a from opencv that takes input as default webcam.
if userImage:
	img_path = os.path.join(imageDir, userImage)
	img_path = face_recognition.load_image_file(img_path)
	IMAGE_FILES.append(img_path)
	filename.append(userImage.split(".", 1)[0])
Loading image using function face_recognition.load_image_file() into an array IMAGE_FILES and also storing image file name into filename array.
def encoding_img(IMAGE_FILES):
    encodeList = []
    for img in IMAGE_FILES:
        img = cv2.cvtColor(img, cv2.COLOR_BGR2RGB)
        encode = face_recognition.face_encodings(img)[0]
        encodeList.append(encode)
        return encodeList

encodeListknown = encoding_img(IMAGE_FILES)
Encoding image data using face_recognition.face_encodings() funtion. The encoded data will be used by face_recognition package for performing operations.
while True:
    success, img = capture.read()
    imgc = cv2.resize(img, (0, 0), None, 0.25, 0.25)
    imgc = cv2.cvtColor(img, cv2.COLOR_BGR2RGB)

    facesCurrent = face_recognition.face_locations(imgc)
    encodeFacesCurrent = face_recognition.face_encodings(imgc, facesCurrent)
We will loop through infinitly and store captured frame into img variable. Then we will have a new img frame variable to store resized image and the scale of decrement is 0.25% on both x and y.
we will use this in face_recognition package function face_locations and face_encodings and get the face locations and encoding of incoming frames.
for encodeFace, faceloc in zip(encodeFacesCurrent, facesCurrent):
matchesFace = face_recognition.compare_faces(encodeListknown, encodeFace)
faceDistance = face_recognition.face_distance(encodeListknown, encodeFace)
matchindex = np.argmin(faceDistance)
if matchesFace[matchindex]:
name = filename[matchindex].upper()
putText = 'Captured'
y1, x2, y2, x1 = faceloc
cv2.rectangle(img, (x1, y1), (x2, y2), (255, 0, 0), 2)
cv2.rectangle(img, (x1, y2 - 35), (x2, y2), (255, 0, 0), 2, cv2.FILLED)
cv2.putText(img, putText, (x1 + 6, y2 - 6), cv2.FONT_HERSHEY_SIMPLEX, 1, (255, 255, 255), 2)
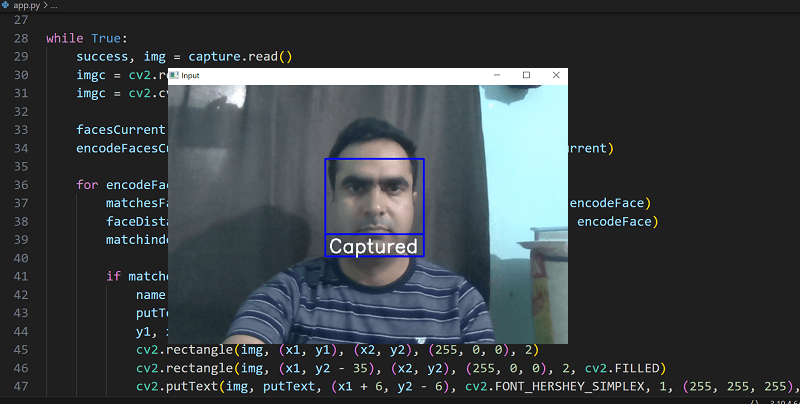
cv2.imshow('Input', img)
We will create loop and loop through encoded incoming frame and use function face_recognition.compare_faces() to get face matches and use face_recognition.face_distance() function to get face distance. We will get the match index.
Then we will check for matched face and get matched face filename. We will also put text and add rectangle to matched face. We will show face within rectangle in webcam.
key = cv2.waitKey(20)
    if key == 27:
        capture.release()
        cv2.destroyAllWindows()
        break
We will wait for key using function cv2.waitKey(20) and check for escape key press to release capture and destroy capture window.
Complete Source Code
import cv2
import numpy as np
import face_recognition
import os

IMAGE_FILES = []
filename = []
imageDir = 'photos'
userImage = 'webdamn.jpg'
if userImage:
    img_path = os.path.join(imageDir, userImage)
    img_path = face_recognition.load_image_file(img_path)
    IMAGE_FILES.append(img_path)
    filename.append(userImage.split(".", 1)[0])

def encoding_img(IMAGE_FILES):
    encodeList = []
    for img in IMAGE_FILES:
        img = cv2.cvtColor(img, cv2.COLOR_BGR2RGB)
        encode = face_recognition.face_encodings(img)[0]
        encodeList.append(encode)
        return encodeList

encodeListknown = encoding_img(IMAGE_FILES)

capture = cv2.VideoCapture(0)

while True:
    success, img = capture.read()
    imgc = cv2.resize(img, (0, 0), None, 0.25, 0.25)
    imgc = cv2.cvtColor(img, cv2.COLOR_BGR2RGB)

    facesCurrent = face_recognition.face_locations(imgc)
    encodeFacesCurrent = face_recognition.face_encodings(imgc, facesCurrent)

    for encodeFace, faceloc in zip(encodeFacesCurrent, facesCurrent):
        matchesFace = face_recognition.compare_faces(encodeListknown, encodeFace)
        faceDistance = face_recognition.face_distance(encodeListknown, encodeFace)
        matchindex = np.argmin(faceDistance)

        if matchesFace[matchindex]:
            name = filename[matchindex].upper()
            putText = 'Captured'
            y1, x2, y2, x1 = faceloc
            cv2.rectangle(img, (x1, y1), (x2, y2), (255, 0, 0), 2)
            cv2.rectangle(img, (x1, y2 - 35), (x2, y2), (255, 0, 0), 2, cv2.FILLED)
            cv2.putText(img, putText, (x1 + 6, y2 - 6), cv2.FONT_HERSHEY_SIMPLEX, 1, (255, 255, 255), 2)


    cv2.imshow('Input', img)
    key = cv2.waitKey(20)
    if key == 27:
        capture.release()
        cv2.destroyAllWindows()
        break
Conclusion
In this tutorial, we have explained to implement functionality for face recognition using OpenCV and Face Recognition packages fro python. You can try this at your end and enhance to add functionality as per needs to make complete system. Cheers!
You can download the complete source code of project from the Download link below.
Download