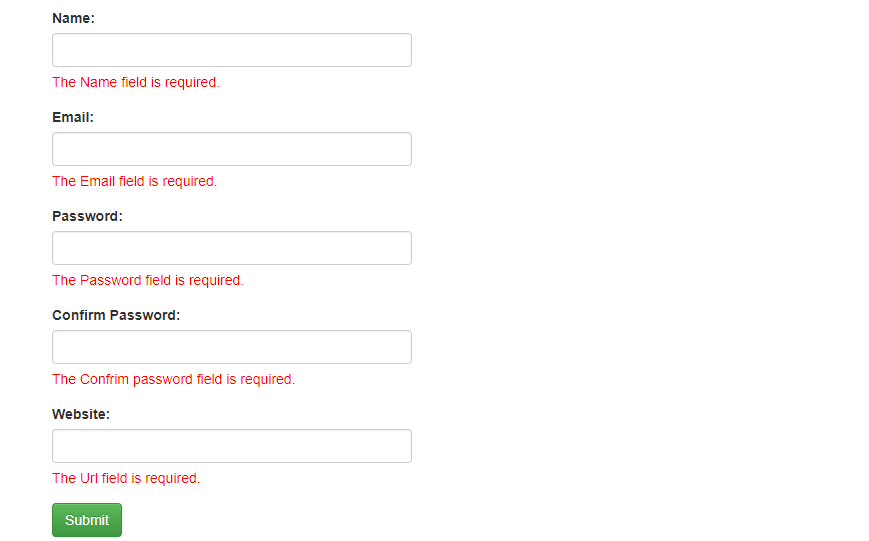
CodeIgniter Tutorial for Beginners

CodeIgniter is one of the most popular PHP framework based on MVC (Model–View–Controller) pattern. MVC is the most used pattern in web applications and most of PHP frameworks are based on this pattern. The MVC pattern divides an application into three parts: Model, View, Controller. The Model is responsible for handling data. The View is responsible for rendering the data provided by the model. The Controller is responsible to handle the Model and View to work together.

With CodeIgniter, you can easily develop small to large scale of applications based on MVC pattern. The CodeIgniter framework is very lightweight and easy to learn as it enables to develop projects much faster by providing a rich set of libraries for commonly needed tasks, as well as a simple interface and logical structure to access these libraries.

So here in this tutorial, you will learn how to start with CodeIgniter to setup CodeIgniter framework to start with it quickly. We have also explain how to create CodeIgniter project to create live demo to display images list from MySQL database. (more…)

Create Material Design Drop Down Menu

The Material Design is getting more and more popular day by day. Designers are talking about this and there are many websites designed using Material Design.

The Material Design using more grid-based layouts, responsive animations and transitions, padding, and depth effects such as lighting and shadows. So you can create great design using this.

In our previous tutorial you have learned how to design Login and Register Form using Material Design. In this tutorial you will learn how to create Drop down Menus using material Design. The tutorial will cover drop down menus design with demo and complete demo script to download.

(more…)

Create Material Design Login and Register Form

Google’s Material Design is getting more popular on each passing day due o its awesome design and features. Now more designers started thinking about to design website using Material Design.

The Material Design uses more grid-based layouts, responsive animations and transitions, padding, and depth effects such as lighting and shadows.

So if you’re thinking about designing your user login and register form using Material Design, then you’re here at right place. In this tutorial you will learn how to design user Login and Register Form using Material Design.

We will cover this tutorial in easy steps to design user login and register using Material Design with live demo. You can also download complete source code of this demo.

Material Design Login and Register Form

(more…)

Make Multi Step Form with Progress Bar using jQuery, Bootstrap & PHP

Forms with too many input fields are boring and annoyed to users. We can replace them with Multi Step Forms to make it more user friendly.

The Multi Step Forms are the best solution when there are too many input fields in a Form. So breaking the large Form into multiple smaller Forms with few input fields on each Form is very smart and user friendly solution.

So here in this tutorial, you will learn how to implement Multi Step Forms with Progress Bar using Bootstrap, jQuery and PHP with live Demo.

You will also learn how to validate multiple forms using jQuery and store multiple Forms submit data into MySQL database using PHP.

(more…)

Login and Registration Script with PHP & MySQL

The User Registration and Login is an important feature of any web projects. In which user’s are allowed to register themselves to manage their account and provided roles to allow access to particular section.

So if your’re looking for user registration and login solution then you’re here at right place. In this tutorial you will learn how to develop user login and registration system with PHP and MySQL to use in any web project.

You can also enhance user login functionality with features like user login with OTP and user login with remember me password feature and
user password reset functionality. You can also create complete user management system with PHP & MySQL to manage user functionality with admin panel.

We will cover this tutorial in easy steps with live demo to handle complete user registration and login functionality with server side validation. You can also download the complete register and login script created with PHP and MySQL.

Also, read:

Let’s start implementing the user login and registration functionality with PHP and MySQL. Before you begin, take a look on files structure. We need following files for this tutorial.

  • db_connect.php
  • index.php
  • login.php
  • register.php
  • logout.php

1. Create Database Table

In this tutorial we will need a database table to store user details. So we will create table users to store user information.

CREATE TABLE IF NOT EXISTS `users` (
  `uid` int(11) NOT NULL AUTO_INCREMENT,
  `user` varchar(255) DEFAULT NULL,
  `pass` varchar(100) DEFAULT NULL,
  `email` varchar(255) DEFAULT NULL,
  `profile_photo` varchar(200) DEFAULT NULL,
  PRIMARY KEY (`uid`),
  UNIQUE KEY `username` (`user`),
  UNIQUE KEY `email` (`email`)
) ENGINE=InnoDB  DEFAULT CHARSET=latin1 AUTO_INCREMENT=1 ;

2. Create Database Connection

We will create a PHP file db_connect.php to make connection with MySQL database.

<?php
/* Database connection start */
$servername = "localhost";
$username = "root";
$password = "";
$dbname = "demos";
$conn = mysqli_connect($servername, $username, $password, $dbname);
if (mysqli_connect_errno()) {
    printf("Connect failed: %s\n", mysqli_connect_error());
    exit();
}
?>

3. Create Main HTML for Login/Register

First we will create main file index.php to display Login/Register link. We will also display logged in user details on this page instead of Login/Register link when user successfully logged in.

<div class="container">
	<h2>Example: Login and Registration Script with PHP, MySQL</h2>		
	<div class="collapse navbar-collapse" >
		<ul class="nav navbar-nav navbar-left">
			<?php if (isset($_SESSION['user_id'])) { ?>
			<li><p class="navbar-text"><strong>Welcome!</strong> You're signed in as <strong><?php echo $_SESSION['user_name']; ?></strong></p></li>
			<li><a href="logout.php">Log Out</a></li>
			<?php } else { ?>
			<li><a href="login.php">Login</a></li>
			<li><a href="register.php">Sign Up</a></li>
			<?php } ?>
		</ul>
	</div>	
</div>	

4. Create User Register Form HTML

Now we will create register.php file and create register Form HTML.

<div class="container">
<h2>Example: Login and Registration Script with PHP, MySQL</h2>	
	<div class="row">
		<div class="col-md-4 col-md-offset-4 well">
			<form role="form" action="<?php echo $_SERVER['PHP_SELF']; ?>" method="post" name="signupform">
				<fieldset>
					<legend>Sign Up</legend>
					<div class="form-group">
						<label for="name">Name</label>
						<input type="text" name="name" placeholder="Enter Full Name" required value="<?php if($error) echo $name; ?>" class="form-control" />
						<span class="text-danger"><?php if (isset($uname_error)) echo $uname_error; ?></span>
					</div>					
					<div class="form-group">
						<label for="name">Email</label>
						<input type="text" name="email" placeholder="Email" required value="<?php if($error) echo $email; ?>" class="form-control" />
						<span class="text-danger"><?php if (isset($email_error)) echo $email_error; ?></span>
					</div>
					<div class="form-group">
						<label for="name">Password</label>
						<input type="password" name="password" placeholder="Password" required class="form-control" />
						<span class="text-danger"><?php if (isset($password_error)) echo $password_error; ?></span>
					</div>
					<div class="form-group">
						<label for="name">Confirm Password</label>
						<input type="password" name="cpassword" placeholder="Confirm Password" required class="form-control" />
						<span class="text-danger"><?php if (isset($cpassword_error)) echo $cpassword_error; ?></span>
					</div>
					<div class="form-group">
						<input type="submit" name="signup" value="Sign Up" class="btn btn-primary" />
					</div>
				</fieldset>
			</form>
			<span class="text-success"><?php if (isset($success_message)) { echo $success_message; } ?></span>
			<span class="text-danger"><?php if (isset($error_message)) { echo $error_message; } ?></span>
		</div>
	</div>
	<div class="row">
		<div class="col-md-4 col-md-offset-4 text-center">	
		Already Registered? <a href="login.php">Login Here</a>
		</div>
	</div>	
</div>

5. User Register Functionality with Form Validation

Now in same register.php file, we will handle user registration functionality by validating form input values like user name, email password and user store details in MySQL database table users

<?php
include_once("db_connect.php");
session_start();
if(isset($_SESSION['user_id'])) {
	header("Location: index.php");
}
$error = false;
if (isset($_POST['signup'])) {
	$name = mysqli_real_escape_string($conn, $_POST['name']);
	$email = mysqli_real_escape_string($conn, $_POST['email']);
	$password = mysqli_real_escape_string($conn, $_POST['password']);
	$cpassword = mysqli_real_escape_string($conn, $_POST['cpassword']);	
	if (!preg_match("/^[a-zA-Z ]+$/",$name)) {
		$error = true;
		$uname_error = "Name must contain only alphabets and space";
	}
	if(!filter_var($email,FILTER_VALIDATE_EMAIL)) {
		$error = true;
		$email_error = "Please Enter Valid Email ID";
	}
	if(strlen($password) < 6) {
		$error = true;
		$password_error = "Password must be minimum of 6 characters";
	}
	if($password != $cpassword) {
		$error = true;
		$cpassword_error = "Password and Confirm Password doesn't match";
	}
	if (!$error) {
		if(mysqli_query($conn, "INSERT INTO users(user, email, pass) VALUES('" . $name . "', '" . $email . "', '" . md5($password) . "')")) {
			$success_message = "Successfully Registered! <a href='login.php'>Click here to Login</a>";
		} else {
			$error_message = "Error in registering...Please try again later!";
		}
	}
}
?>

6. Create User Login Form HTML

Now we will create login.php file and create user login Form HTML.

<div class="container">
	<h2>Example: Login and Registration Script with PHP, MySQL</h2>		
	<div class="row">
		<div class="col-md-4 col-md-offset-4 well">
			<form role="form" action="<?php echo $_SERVER['PHP_SELF']; ?>" method="post" name="loginform">
				<fieldset>
					<legend>Login</legend>						
					<div class="form-group">
						<label for="name">Email</label>
						<input type="text" name="email" placeholder="Your Email" required class="form-control" />
					</div>	
					<div class="form-group">
						<label for="name">Password</label>
						<input type="password" name="password" placeholder="Your Password" required class="form-control" />
					</div>	
					<div class="form-group">
						<input type="submit" name="login" value="Login" class="btn btn-primary" />
					</div>
				</fieldset>
			</form>
			<span class="text-danger"><?php if (isset($error_message)) { echo $error_message; } ?></span>
		</div>
	</div>
	<div class="row">
		<div class="col-md-4 col-md-offset-4 text-center">	
		New User? <a href="register.php">Sign Up Here</a>
		</div>
	</div>	
</div>

7. User Login Functionality with Form Validation

Now in same login.php file, we will handle user login functionality with from validation and get user details from MySQL database table users. If user login successful, then stored user id and user name in SESSION variables to check for user login status and redirected to index.php to display user as logged in with user details and Logout link.

<?php
session_start();
include_once("db_connect.php");
if(isset($_SESSION['user_id'])!="") {
	header("Location: index.php");
}
if (isset($_POST['login'])) {
	$email = mysqli_real_escape_string($conn, $_POST['email']);
	$password = mysqli_real_escape_string($conn, $_POST['password']);
	$result = mysqli_query($conn, "SELECT * FROM users WHERE email = '" . $email. "' and pass = '" . md5($password). "'");
	if ($row = mysqli_fetch_array($result)) {
		$_SESSION['user_id'] = $row['uid'];
		$_SESSION['user_name'] = $row['user'];
		header("Location: index.php");
	} else {
		$error_message = "Incorrect Email or Password!!!";
	}
}
?>

8. User Logout Functionality

Now finally in logout.php, we will handle user logout functionality by unset SESSION variables to make user logout.

<?php
ob_start();
session_start();
if(isset($_SESSION['user_id'])) {
	session_destroy();
	unset($_SESSION['user_id']);
	unset($_SESSION['user_name']);
	header("Location: index.php");
} else {
	header("Location: index.php");
}
?>

You may also like:

You can view the live demo from the Demo link and can download the script from the Download link below.
Demo Download

Load Data On Page Scroll with jQuery, PHP & MySQL

You’re well familiar with the pagination used with large data in web projects to view records in multiple pages. The Pagination provides quick solution for large data and good user interface but its needs to click next or previous button to view pages. Suppose if you want to view previous page then you need to click again to load previous page.

So if you’re looking for more user friendly solution to replace pagination, then you’re at right place. You can replace pagination with more user friendly feature to load chunks of records on each time when page scroll. With this feature, users do not need to click on next or previous button, the records are loaded when page scroll.

In this tutorial you will learn how to load more records dynamically when scroll page using Ajax with PHP and MySQL. We will cover this tutorial in easy steps with live demo.


(more…)