Google’s Material Design is getting more popular on each passing day due o its awesome design and features. Now more designers started thinking about to design website using Material Design.
The Material Design uses more grid-based layouts, responsive animations and transitions, padding, and depth effects such as lighting and shadows.
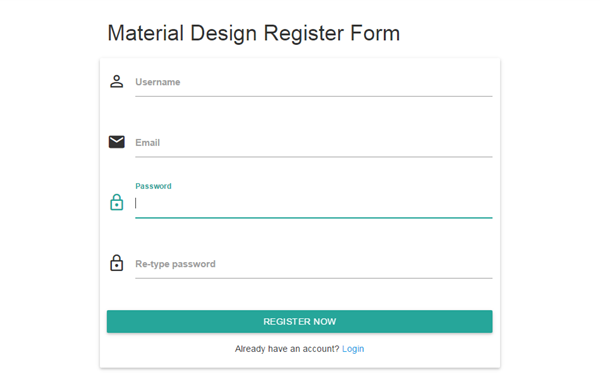
So if you’re thinking about designing your user login and register form using Material Design, then you’re here at right place. In this tutorial you will learn how to design user Login and Register Form using Material Design.
We will cover this tutorial in easy steps to design user login and register using Material Design with live demo. You can also download complete source code of this demo.

Also, read:
So let’s start,
Before begin, take a look of files structure used for this tutorial.
- login.php
- register.php
Include Material Design CSS and JavaScript Files
First of all we will need to include Material Design CSS and JavaScript files to create HTML using Material Design. It comes with both the minified and unminified CSS and JavaScript CDN files. We just need to include following files to start using Material Design.
<link rel="stylesheet" href="https://cdnjs.cloudflare.com/ajax/libs/materialize/0.97.1/css/materialize.min.css">
<script src="https://cdnjs.cloudflare.com/ajax/libs/materialize/0.97.1/js/materialize.min.js"></script>
Create Material Design Login Form
After including Material Design CSS and JavaScript files, we will start design login form. The Material Design provided great look and feel to Form inputs. We just need to use class .input-field div wrapping input and label. It will enable input border light up and clearly indicating which field the user is currently editing. Material Design also enable us to add an icon prefix to make the Form inputs label more clear. We just need to add class prefix with input related class to display icon prefix. Below complete login Form design using Material Design. In this login Form, we have used email, password and remember me input with relevant icons.
<h4>Material Design Login Form</h4>
<div id="user-login" class="row">
	<div class="col s12 z-depth-6 card-panel">
		<form class="login-form">
			<div class="row margin">
				<div class="input-field col s12">
					<i class="mdi-social-person-outline prefix"></i>
					<input class="validate" id="user_email" type="email">
					<label for="email" data-error="wrong" data-success="right" class="center-align">Email</label>
				</div>
			</div>
			<div class="row margin">
				<div class="input-field col s12">
					<i class="mdi-action-lock-outline prefix"></i>
					<input id="user_pass" type="password">
					<label for="password">Password</label>
				</div>
			</div>
			<div class="row">
				<div class="input-field col s12 m12 l12  login-text">
					<input type="checkbox" id="remember-me" />
					<label for="remember-me">Remember me</label>
				</div>
			</div>
			<div class="row">
				<div class="input-field col s12">
					<a href="login.html" class="btn waves-effect waves-light col s12">Login</a>
				</div>
			</div>
			<div class="row">
				<div class="input-field col s6 m6 l6">
					<p class="margin medium-small"><a href="register.php">Register Now!</a></p>
				</div>
			</div>
		</form>
	</div>
</div>
Create Material Design Register Form
Here is complete register Form HTML designed using Material Design. In this Register From, we have used username, email, password inputs with relevant icons.
<h4>Material Design Register Form</h4>
<div id="register-page" class="row">
	<div class="col s12 z-depth-6 card-panel">
		<form class="register-form">
			<div class="row margin">
				<div class="input-field col s12">
					<i class="mdi-social-person-outline prefix"></i>
					<input id="user_name" type="text" class="validate">
					<label for="user_name" class="center-align">Username</label>
				</div>
			</div>
			<div class="row margin">
				<div class="input-field col s12">
					<i class="mdi-communication-email prefix"></i>
					<input id="user_email" type="email" class="validate">
					<label for="user_email" class="center-align">Email</label>
				</div>
			</div>
			<div class="row margin">
				<div class="input-field col s12">
					<i class="mdi-action-lock-outline prefix"></i>
					<input id="user_passw" type="password" class="validate">
					<label for="user_passw">Password</label>
				</div>
			</div>
			<div class="row margin">
				<div class="input-field col s12">
					<i class="mdi-action-lock-outline prefix"></i>
					<input id="confirm_pass" type="password">
					<label for="confirm_pass">Re-type password</label>
				</div>
			</div>
			<div class="row">
				<div class="input-field col s12">
					<a href="register.html" class="btn waves-effect waves-light col s12">Register Now</a>
				</div>
				<div class="input-field col s12">
					<p class="margin center medium-small sign-up">Already have an account? <a href="login.php">Login</a></p>
				</div>
			</div>
		</form>
	</div>
</div>
You may also like:
- User Management System with PHP & MySQL
- Datatables Add Edit Delete with Ajax, PHP & MySQL
- Build Helpdesk System with jQuery, PHP & MySQL
- Build Online Voting System with PHP & MySQL
- School Management System with PHP & MySQL
- DataTables Add Edit Delete with CodeIgniter
- Create RESTful API using CodeIgniter
- Build Reusable Captcha Script with PHP
- Product Search Filtering using Ajax, PHP & MySQL
- Image Upload and Crop in Modal with jQuery, PHP & MySQL
- Build Push Notification System with PHP & MySQL
- Project Management System with PHP and MySQL
- Hospital Management System with PHP & MySQL
- Build Newsletter System with PHP and MySQL
- Skeleton Screen Loading Effect with Ajax and PHP
- Build Discussion Forum with PHP and MySQL
- Customer Relationship Management (CRM) System with PHP & MySQL
- Online Exam System with PHP & MySQL
- Expense Management System with PHP & MySQL
You can view the live demo from the Demo link and can download the script from the Download link below.
Demo Download
Good post. I’m going through some of these issues as well..
Thanks, it’s very informative
Thanks! You’re welcome!